1、简介
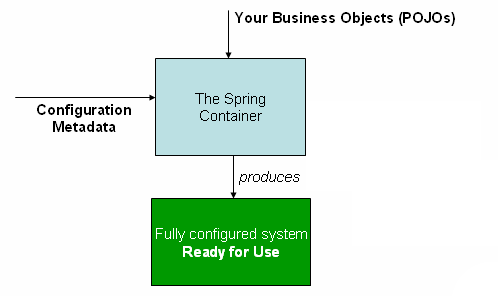
Spring有两大核心功能:IoC、AOP。本节先来分析一下其中的IoC(Inversion of Control),它又名:DI(dependency injection)。它是用来定义和管理对象及对象依赖关系的,依赖的对象可以通过构造参数、工厂方法的参数、或者bean的setter方法获取,而容器可以在需要对象时代替它自动创建它并将依赖关系自动注入,这种机制叫做反转,更强大的名字叫做IoC(控制反转)。
IoC容器的两个核心包为org.springframework.beans和org.springframework.context。BeanFactory接口提供了IoC容器的最高级的抽象。ApplicationContext是BeanFactory的一个子接口(不是直接子接口)。它增加了对AOP、国际化资源处理、事件、应用层级别的上下文控制(如在WEB应用中使用的WebApplicationContext)。
容器的配置数据支撑所有的Bean及Bean之间的依赖关系。IoC容器管理着Bean的装载、实例化。
接口org.springframework.context.ApplicationContext代表Spring IoC容器,负责所有涉及对象的配置、装配、实例化。容器通过读取配置信息来确定哪些对象需要纳入IoC管理。配置信息可以使用XML、Java注解(Spring2.5增加)、Java编码(Spring3.0增加)的方式来进行描述。它允许配置构成应用的对象之间的复杂的依赖关系。
ApplicationContext的一些实现类使得Spring的使用开箱即用。可以直接使用ClassPathXmlApplicationContext或者FileSystemXmlApplicationContext来创建实例。这两个类都是来用来加载XML形式Spring配置的具体实现。XML的配置方式是比较传统的一种格式,也可以使用Java注解及编码方式来代替。来看一下这两个类的类图:
在大多数情况下,在一个IoC容器中,一般情况下,一个类仅需要一个实例即可(即单例模式)。
2、基于XML配置的方式
接下来,使用基于XML的配置方式来构建IoC容器,并跟随例子来分析一下Spring的实现方式。
Spring的XML配置方式的约束方法是使用XML Schema,即XSD文件来约束,所有的配置必须符合XSD文件规范(XSD文件可以在官方文档中找到)。XML配置中的根元素为<beans/>,在<beans>元素下包含一系列的<bean>元素来构成IoC容器的定义。
2.1、最基本的容器实现
说明一下,在以下的具体代码的实现中,为了节省写作空间,在尽量保证能将问题阐述明确的前提下,将省去一些无关紧要的代码。
2.1.1、Bean类的准备
准备两个测试Bean。MyTestBean及MyTestBean2。MyTestBean2将会引用MyTestBean。
MyTestBean :
public class MyTestBean {
	private String name;
	public void printName(){
		System.out.println("name = "+name);
	}
}
MyTestBean2 :
public class MyTestBean2 {
	private MyTestBean myTestBean;
	// getters and setters ...
}
2.1.2、XML配置
为了演示<import>元素,使用两个XML的嵌套。test.xml用于定义MyTestBean类及引入test2.xml。test2.xml用于定义MyTestBean2。
test.xml :
<?xml version="1.0" encoding="UTF-8"?>
<beans xmlns="http://www.springframework.org/schema/beans"
       xmlns:xsi="http://www.w3.org/2001/XMLSchema-instance"
       xsi:schemaLocation="http://www.springframework.org/schema/beans
           http://www.springframework.org/schema/beans/spring-beans.xsd">

	<bean id="myTestBean" class="com.zenfery.example.source.spring.core.MyTestBean">
		<property name="name" value="NameValue" />
	</bean>

	<import resource="test2.xml"/>
</beans>
test2.xml :
<?xml version="1.0" encoding="UTF-8"?>
<beans xmlns="http://www.springframework.org/schema/beans"
       xmlns:xsi="http://www.w3.org/2001/XMLSchema-instance"
       xsi:schemaLocation="http://www.springframework.org/schema/beans
           http://www.springframework.org/schema/beans/spring-beans.xsd">

	<bean id="myTestBean2" class="com.zenfery.example.source.spring.core.MyTestBean2">
		<property name="myTestBean" ref="myTestBean" />
	</bean>
</beans>
两个XML文件都应该放置于Classpath目录中,如果是maven管理项目,则应该于src/main/resources下,保证在运行时可以在Classpath目录下可以检索到。
2.1.3、加载使用IoC容器
//加载IoC容器
ApplicationContext context = new ClassPathXmlApplicationContext("test.xml");
//从IoC获取MyTestBean实例
MyTestBean myTestBean = context.getBean("myTestBean", MyTestBean.class);
//获取MyTestBean2实例
MyTestBean2 myTestBean2 = context.getBean("myTestBean2", MyTestBean2.class);
//从IoC管理的MyTestBean2实例中得到关联的MyTestBean实例
MyTestBean myTestBean_1 = myTestBean2.getMyTestBean();

//比较使用不同方式获取到的两个MyTestBean实例
System.out.println("myTestBean == myTestBean_1 : " + (myTestBean == myTestBean_1) );
//执行方法
myTestBean.printName();
输出结果:
myTestBean == myTestBean_1 : true
name = NameValue
第一行,变量myTestBean和myTestBean_1进行==号比较,结果为相等,说明引用的是同一个堆中的对象。第二行,打印了在test.xml中给myTestBean注入的属性值。
2.2、源码解读IoC容器加载
2.2.1、IoC容器加载
加载IoC容器的代码:ApplicationContext context = new ClassPathXmlApplicationContext("test.xml");。
从1中的类关系图中,可以看出和ClassPathXmlApplicationContext相类似的类还有FileSystemXmlApplicationContext类。这两个类均由同样的父类AbstractXmlApplicationContext继承而来。它们都包含了一系列相似的构造方法进行重载。从名字的组成,基本上就可以看出它们的区别:ClassPathXmlApplicationContext主要用来加载配置文件位于Classpath下的Spring应用,而FileSystemXmlApplicationContext则主要是用于加载配置文件在指定文件系统中的Spring应用。
两个类均有一个核心的加载构造方法(仅名称不一样),如ClassPathXmlApplicationContext中有:
public ClassPathXmlApplicationContext(String[] configLocations, boolean refresh, ApplicationContext parent)
		throws BeansException {

	super(parent);
	setConfigLocations(configLocations);
	if (refresh) {
		refresh();
	}
}
有两个关键的步骤:
- setConfigLocations(); 设置传入的配置文件位置。
- refresh(); 刷新配置。
2.2.1.1、setConfigLocations()方法
它将传入的配置文件名称数组存入到数组属性configLocations中,在存储的过程中,会做一些简单的路径处理,如变量${..}的替换。
2.2.1.2、refresh()方法
该方法是核心方法实现,定义在虚拟类AbstractApplicationContext中,贴出它的源码吧:
public void refresh() throws BeansException, IllegalStateException {
		synchronized (this.startupShutdownMonitor) {
			// Prepare this context for refreshing.
			prepareRefresh();

			// Tell the subclass to refresh the internal bean factory.
			ConfigurableListableBeanFactory beanFactory = obtainFreshBeanFactory();

			// Prepare the bean factory for use in this context.
			prepareBeanFactory(beanFactory);

			try {
				// Allows post-processing of the bean factory in context subclasses.
				postProcessBeanFactory(beanFactory);

				// Invoke factory processors registered as beans in the context.
				invokeBeanFactoryPostProcessors(beanFactory);

				// Register bean processors that intercept bean creation.
				registerBeanPostProcessors(beanFactory);

				// Initialize message source for this context.
				initMessageSource();

				// Initialize event multicaster for this context.
				initApplicationEventMulticaster();

				// Initialize other special beans in specific context subclasses.
				onRefresh();

				// Check for listener beans and register them.
				registerListeners();

				// Instantiate all remaining (non-lazy-init) singletons.
				finishBeanFactoryInitialization(beanFactory);

				// Last step: publish corresponding event.
				finishRefresh();
			}

			catch (BeansException ex) {
				logger.warn("Exception encountered during context.", ex);

				// Destroy already created singletons to avoid dangling resources.
				destroyBeans();

				// Reset 'active' flag.
				cancelRefresh(ex);

				// Propagate exception to caller.
				throw ex;
			}
		}
	}
从上面源码可看出,在加载IoC容器时,做了一系列的事情来完成。下面就一步步来看看这些方法都做了些什么吧。
prepareRefresh() :在真正刷新之前,做一些预处理工作
记录开始时间;记录执行标记(this.active = true);以及初始化一些属性变量及验证必须属性。
obtainFreshBeanFactory(): 得到一个BeanFactory对象
该方法会判断当前环境中是否有BeanFactory,如果有先销毁:
@Override
protected final void refreshBeanFactory() throws BeansException {
	if (hasBeanFactory()) {
		destroyBeans();
		closeBeanFactory();
	}
	//...
}
创建一个全新的BeanFactroy,并且设置BeanFactory的唯一的一个ID,设置一些自定义的特性,以及最重要一点,加载Bean的定义,最终将生成的BeanFactory设置到成员变量beanFactory中:
DefaultListableBeanFactory beanFactory = createBeanFactory();
beanFactory.setSerializationId(getId());
customizeBeanFactory(beanFactory);
loadBeanDefinitions(beanFactory);
synchronized (this.beanFactoryMonitor) {
	this.beanFactory = beanFactory;
}
loadBeanDefinitions()方法使用XmlBeanDefinitionReader来进行XML的读取解析:
@Override
	protected void loadBeanDefinitions(DefaultListableBeanFactory beanFactory) throws BeansException, IOException {
		XmlBeanDefinitionReader beanDefinitionReader = new XmlBeanDefinitionReader(beanFactory);
// ...
		loadBeanDefinitions(beanDefinitionReader);
	}
将配置文件路径转化成Resource对象:public Resource[] getResources(String locationPattern)使用此方法,位于PathMatchingResourcePatternResolver类中。在这个方法层层调用的里面,有一个逻辑比较简单的方法,它可以处理大部分的路径情况,来看下DefaultResourceLoader.getResource(String location):
	public Resource getResource(String location) {
		Assert.notNull(location, "Location must not be null");
		if (location.startsWith(CLASSPATH_URL_PREFIX)) {
			return new ClassPathResource(location.substring(CLASSPATH_URL_PREFIX.length()), getClassLoader());
		}
		else {
			try {
				// Try to parse the location as a URL...
				URL url = new URL(location);
				return new UrlResource(url);
			}
			catch (MalformedURLException ex) {
				// No URL -> resolve as resource path.
				return getResourceByPath(location);
			}
		}
	}
它的逻辑:首先判断是否是以classpath开头,如果是以classpath开头,将会在Classpath中寻找资源;也可以尝试使用URL来探测路径,如果出现异常,再尝试使用Classpath的方式再尝试读取。
到此为止,已经将所有的location转化成Resource对象了,接下来就是解析Resouce对象了。方法:XmlBeanDefinitionReader.doLoadBeanDefinitions(InputSource inputSource, Resource resource)。核心代码:
int validationMode = getValidationModeForResource(resource);
Document doc = this.documentLoader.loadDocument(
	inputSource, getEntityResolver(), this.errorHandler, validationMode, isNamespaceAware());
return registerBeanDefinitions(doc, resource);
获取资源文件的校验模式,由源码可以看出,默认上都是采用XSD文件来校验约束的,仅有Spring2.0之前才使用DTD来校验。
protected int getValidationModeForResource(Resource resource) {
		// ...
		return VALIDATION_XSD;
	}
使用Java基础包来解析xml配置,生成Document对象。然后将doc注册至BeanFactory中。
至此,可以在this.beanFactory属性中获得BeanFactory对象,此对象的beanDefinitionNames和beanDefinitionMap属性存储着定义Bean的名称列表及定义的详细信息。
prepareBeanFactory() :预置BeanFactory
此方法对已经生成的BeanFactory做一些配置处理:设置后续Bean加载的ClassLoader;注册一些特殊用途的Bean。
postProcessBeanFactory(beanFactory) : 用于BeanFactory的后置处理动作
默认实现为空,不作任何处理,可在子类实现并重写它。
invokeBeanFactoryPostProcessors(beanFactory) : 执行注册的BeanFactoryPostProcessor对象
定义的BeanFactoryPostProcessor类,在Bean定义读取结束后,执行。
registerBeanPostProcessors(beanFactory) : 注册BeanPostProcessor对象
initMessageSource():初始化Spring的资源
initApplicationEventMulticaster():初始化容器的事件处理器
onRefresh():用于子类实现重写
registerListeners():注册ApplicationListener监听器
finishBeanFactoryInitialization():结束初始化,创建单例Bean
beanFactory.preInstantiateSingletons()方法用于创建所有的单例Bean,创建的单例存储在this.singletonObjects属性中,顺便提一下,pototype类型的对象存储在this.prototypesCurrentlyInCreation属性中。
finishRefresh():做一些容器完成后的扫尾工作,事件处理等
2.2.2、IoC容器的使用
可以使用public <T> T getBean(String name, Class<T> requiredType)方法来获取Bean(而在实际生产应用中,程序员一般不需要使用此方法,所有对象的应用都尽量使用依赖注入的方式来自动处理)。
3、Bean
Spring IoC就是用来管理Bean的。在XML的配置方式中,使用<bean/>标签定义;在容器内部,使用BeanDefinition来存储定义Bean,它主要包含以下元数据:
- 完整包名的类路径。
- Bean的行为配置信息,如scope、lifecycle、callbacks等。
- 关联的其它Bean,通常叫做依赖。
- 其它类的配置信息,如连接池的连接参数:最大连接数。
ApplicationContext的实现类允许注册容器定义之外的对象,ApplicationContext.getAutowireCapableBeanFactory()方法返回一个AutowireCapableBeanFactory的BeanFactory对象,它仅有一个具体的实现在AbstractApplicationContext.getAutowireCapableBeanFactory()中,代码如下:
public AutowireCapableBeanFactory getAutowireCapableBeanFactory() throws IllegalStateException {
		return getBeanFactory();
	}
getBeanFactory()的实现为AbstractRefreshableApplicationContext.getBeanFactory()方法,如下:
@Override
	public final ConfigurableListableBeanFactory getBeanFactory() {
		// ...
			return this.beanFactory;
		// ...
	}
从源码可以看出,返回的BeanFactory为ConfigurableListableBeanFactory对象,而ConfigurableListableBeanFactory是AutowireCapableBeanFactory的一个子接口。从代码可以看出,实际上返回的是容器在加载时保存在this.beanFactory成员变量中的真正的BeanFactory。那么这个BeanFactory的实际对象到底是什么呢?回头再看一下第2节中的源码分析,使用new ClassPathXmlApplicationContext()创建的BeanFactory,层层代码深入,有以下代码用于创建真正的BeanFactory:
DefaultListableBeanFactory beanFactory = createBeanFactory();
实际生成的BeanFactory是一个DefaultListableBeanFactory对象,而它是ConfigurableListableBeanFactory的子类,DefaultListableBeanFactory是一个具体的实现类,可实例化。至此,可以看出DefaultListableBeanFactory才是IoC加载完成后的核心类。
DefaultListableBeanFactory有两个方法registerSingleton(..)和registerBeanDefinition(..)用于注册容器配置之外的对象和Bean定义。
3.1、Bean的名称
在基于XML的配置中,可以使用id或者name属性来指定Bean的标识,id必须是唯一,也可以使用name属性来为Bean指定多于一个的标识,多个标识之间可以使用,号、;号、空格隔开。还可以采用alias标签为bean取别名。如:
<alias name="fromName" alias="toName"/>
3.2、Bean的实例化
3.2.1、使用构造方法实例化
<bean id="exampleBean" class="examples.ExampleBean"/>
3.2.2、静态工厂方法
使用静态工厂方法,要求工厂方法必须是static的:
<bean id="clientService"
      class="examples.ClientService"
      factory-method="createInstance"/>
3.2.3、使用实例工厂方法
注意:使用此方法,将不要class属性:
<bean id="serviceLocator" class="examples.DefaultServiceLocator"></bean>

<bean id="clientService"
      factory-bean="serviceLocator"
      factory-method="createClientServiceInstance"/>
3.3、Bean的依赖注入(DI)
实际上,所有应用都要涉及到类之间的依赖关系,Spring帮助应用管理这些依赖关系,从而简化开发。Spring主要提供了两种依赖注入方式:构造器注入、Set方法注入。
3.3.1、构造器注入(Constructor-based dependency injection)
参数类型引用注入:
  <bean id="foo" class="x.y.Foo">
      <constructor-arg ref="bar"/>
      <constructor-arg ref="baz"/>
  </bean>

  <bean id="bar" class="x.y.Bar"/>
  <bean id="baz" class="x.y.Baz"/>
参数类型匹配,使用type属性:
<bean id="exampleBean" class="examples.ExampleBean">
<constructor-arg type="int" value="7500000"/>
<constructor-arg type="java.lang.String" value="42"/>
</bean>
参数索引注入:
<bean id="exampleBean" class="examples.ExampleBean">
<constructor-arg index="0" value="7500000"/>
<constructor-arg index="1" value="42"/>
</bean>
指定参数名称进行匹配(Spring 3.0之后):
<bean id="exampleBean" class="examples.ExampleBean">
<constructor-arg name="years" value="7500000"/>
<constructor-arg name="ultimateanswer" value="42"/>
</bean>
使用这种方式,是需要有条件前提的,一种方式是使用源码debug模式进行编译;另外一种方式是使用注解@ConstructorProperties 如下:
@ConstructorProperties({"years", "ultimateAnswer"})
public ExampleBean(int years, String ultimateAnswer) {
      this.years = years;
      this.ultimateAnswer = ultimateAnswer;
}
其它的一些形式:
ref标签形式:
<property name="beanOne"><ref bean="anotherExampleBean"/></property>
工厂方法参数形式:
<bean id="exampleBean" class="examples.ExampleBean"
    factory-method="createInstance">
<constructor-arg ref="anotherExampleBean"/>
<constructor-arg ref="yetAnotherBean"/>
<constructor-arg value="1"/>
</bean>

<bean id="anotherExampleBean" class="examples.AnotherBean"/>
<bean id="yetAnotherBean" class="examples.YetAnotherBean"/>
3.3.2、setter方法注入:
<bean id="exampleBean" class="examples.ExampleBean">

<property name="beanOne"><ref bean="anotherExampleBean"/></property>

<property name="beanTwo" ref="yetAnotherBean"/>
<property name="integerProperty" value="1"/>
</bean>

<bean id="anotherExampleBean" class="examples.AnotherBean"/>
<bean id="yetAnotherBean" class="examples.YetAnotherBean"/>
3.3.3、一些配置
配置java.util.Properties实例
<bean id="mappings"
class="org.springframework.beans.factory.config.PropertyPlaceholderConfigurer">
 <property name="properties">
    <value>
       jdbc.driver.className=com.mysql.jdbc.Driver
       jdbc.url=jdbc:mysql://localhost:3306/mydb
    </value>
 </property>
</bean>
idref元素
在<constructor-arg/>或<property/>下使用,相当于value值,只不过使用idref需要校验值是否是一个bean的id值。如:
<property name="targetName">
      <idref bean="theTargetBean" />
</property>
<property name="targetName" value="theTargetBean" />
还可以使用local属性,表示验证在当前的xml中是否存在bean的id为指定的值。
<property name="targetName">
 <!-- a bean with id 'theTargetBean' must exist; otherwise an exception will be thrown -->
 <idref local="theTargetBean"/>
</property>
ref关联其它Bean
<ref bean="someBean"/>
<ref local="someBean"/> <!-- 同一个文件中 -->
父子容器:
<!-- 父容器 -->
<bean id="accountService" class="com.foo.SimpleAccountService"></bean>
<!-- 子容器 -->
<bean id="accountService"  <-- 和父容器的id相同 -->
    class="org.springframework.aop.framework.ProxyFactoryBean">
    <property name="target">
        <ref parent="accountService"/>  <!-- 关联父容器 -->
    </property>
</bean>
内联Bean
<bean id="outer" class="...">
<property name="target">
  <bean class="com.example.Person"> <!-- 内联bean -->
    <property name="name" value="Fiona Apple"/>
    <property name="age" value="25"/>
  </bean>
</property>
</bean>
内联bean不需要id或name属性,它也会忽略scope属性,其它bean不能关联它。
集合定义
<bean id="moreComplexObject" class="example.ComplexObject">
<!-- results in a setAdminEmails(java.util.Properties) call -->
<property name="adminEmails">
  <props>
      <prop key="administrator">administrator@example.org</prop>
      <prop key="support">support@example.org</prop>
      <prop key="development">development@example.org</prop>
  </props>
</property>
<!-- results in a setSomeList(java.util.List) call -->
<property name="someList">
  <list>
      <value>a list element followed by a reference</value>
      <ref bean="myDataSource" />
  </list>
</property>
<!-- results in a setSomeMap(java.util.Map) call -->
<property name="someMap">
  <map>
      <entry key="an entry" value="just some string"/>
      <entry key ="a ref" value-ref="myDataSource"/>
  </map>
</property>
<!-- results in a setSomeSet(java.util.Set) call -->
<property name="someSet">
  <set>
      <value>just some string</value>
      <ref bean="myDataSource" />
  </set>
</property>
</bean>
map的key或value值,以及set的value值可以取自以下标签:
bean | ref | idref | list | set | map | props | value | null
null值和空值定义
<property name="email" value=""/>
<property name="email"><null/></property>
p:和c:简写
<bean name="john-classic" class="com.example.Person">
      <property name="name" value="John Doe"/>
      <property name="spouse" ref="jane"/>
  </bean>

  <bean name="john-modern"
      class="com.example.Person"
      p:name="John Doe"
      p:spouse-ref="jane"/>
<-- 'traditional' declaration -->
  <bean id="foo" class="x.y.Foo">
      <constructor-arg ref="bar"/>
      <constructor-arg ref="baz"/>
      <constructor-arg value="foo@bar.com"/>
  </bean>

  <-- 'c-namespace' declaration -->
  <bean id="foo" class="x.y.Foo" c:bar-ref="bar" c:baz-ref="baz" c:email="foo@bar.com">
<-- 'c-namespace' index declaration -->
<bean id="foo" class="x.y.Foo" c:_0-ref="bar" c:_1-ref="baz">
复合属性
<bean id="foo" class="foo.Bar">
<property name="fred.bob.sammy" value="123" />
</bean>
3.3.4、使用depends-on
depends-on能保证依赖的对象先进行加载。
<bean id="beanOne" class="ExampleBean" depends-on="manager,accountDao">
<property name="manager" ref="manager" />
</bean>

<bean id="manager" class="ManagerBean" />
<bean id="accountDao" class="x.y.jdbc.JdbcAccountDao" />
注:depends-on也能改变对象的回收顺序,配置有依赖的对象比被依赖的对象先被回收。
3.3.5、Bean懒加载
默认情况下,ApplicationContext的实现会在IoC容器初始化进程时实例化所有的单例(singleton)对象,在这种机制下,实例化错误会及早地被发现。如果需要使bean的实例化不是在容器启动时就发生,而是在第一次使用它时才实例化,可以在<bean/>标签中加入属性lazy-init=true”来实现。如:
<bean id="lazy" class="com.foo.ExpensiveToCreateBean" lazy-init="true"/>

<bean name="not.lazy" class="com.foo.AnotherBean"/>
注意:在非延迟加载的单例所依赖的bean为延迟加载的情况下,依赖的bean的延迟加载效果将会失效。
也可以在容器级别改变默认行为,使容器中的所有bean设置为默认延实例化:在<beans/>标签中加入属性default-lazy-init=”true”。如:
<beans default-lazy-init="true">
  <!-- no beans will be pre-instantiated... -->
</beans>
3.3.6、自动绑定Bean(autowire)
现在常用的是注解@Autowired和@Qualifier来实现此功能,不做详细解释。用法为在<bean/>标签中增加autowire属性来实现,它的取值可以为:no、byName、byType、constructor。
4、BeanFactory
BeanFactory是IoC容器的基本,但是它的功能比较单一,官方建议使用ApplicationContext,ApplicationContext支持 BeanPostProcessor、 BeanFactoryPostProcessor的注册, 方便地访问MessageSource,ApplicationEvent的发布。
转载请注明:子暃之路 » Spring主要功能解读(1)-IoC容器


